I have been on a dedicated photography trip to Santorini. This fantastic trip has culminated in me producing a website called Photos of Santorini. And you have found it so welcome.
In this series of two posts, titled Santorini Photography Tips, I will tell you everything that I have learned on my photographic trip to the Greek Island of Santorini. This is in addition to the 20 images and accompanying blog posts which are already on this website. And lets not forget my Big Fat Greek photo gallery!
After reading this post (in two parts) you will be much better informed on what to expect from a photographic trip to Santorini, and also get some tips from me for photography trips to other places.
About my new website Photos of Santorini
I never thought that a photography trip to Santorini would result in me producing a brand new website dedicated to my Santorini photos but here we are!
This post is the last post for now. I have already published some introductory posts which I wrote when I created this website. The bulk of the content is the 20 posts about the 20 Santorini photos which I completed yesterday.
This is and the complete set of fully edited photos of Santorini which you can find in a single online gallery which I am going to call My Fat Big Greek Photo Gallery.
This post is a summary of everything that I experienced and learned from my trip to Santorini.
Planning at home
I have to be honest here, I am not a big one for planning photography trips whilst I am at home. Of course I will do a bit of research to find out if there is enough of interest in a location for me to photograph, but once I have established that the location is interesting enough for me to photograph is my planning pretty much done!
I do not search through Google looking at photos that others have already taken. I don’t want to know what other people have photographed. This way I do not arrive there with any pre-conceptions, I don’t have other peoples work cluttering my head.
I get to a location knowing the general landscape and topography and take it from there. I like to find things myself, on foot, or in a car.
And that is pretty much what I did in Santorini – I spent a lot of time finding things to take photos of.
Now I am not saying that this is the best way to approach photographing a new location, but it works for me and makes it more of an adventure. I am sure I am missing out on some of the headline glamour shots but I am fine with that. My way I might find something that is less photographed and have more interest.
There is of course a downside to this – I might unwittingly stumble on some headline photography locations and photograph them to within an inch of their lives.
But I am happy to take that risk!
There is one thing that I do ascertain before I go anywhere though – the time of sunrise and sunset, and also how the sun traverses from one to the other in relation to the location I am going to.
Gear
For a trip like this I travel light. This is through choice. Bearing in mind that I am on a photographic journey of discovery on foot the last thing I want to do is be loaded down with a bag full of gear.
I used to carry everything in one single, large Lowepro bag. I could barely lift the bag onto my shoulders, and adding a tripod to the outside of the bag made it even more of a nightmare, making the bag heavier and more unwieldy.
Getting anything out of my bag was too much trouble.
But still I had all my gear with me ha!!!
It got to the point where I first stopped using my tripod, and then actually stopped taking my tripod with me at all, leaving it in the boot my car
And I used very little of the gear that I was actually carrying.
That was some time ago, and a number of foreign trips have forced me to change my ways. That and of course working on live construction sites where I need to be lightweight and nimble on my feet.
And the realisation that I was being quite stupid – that particular penny needed to drop.
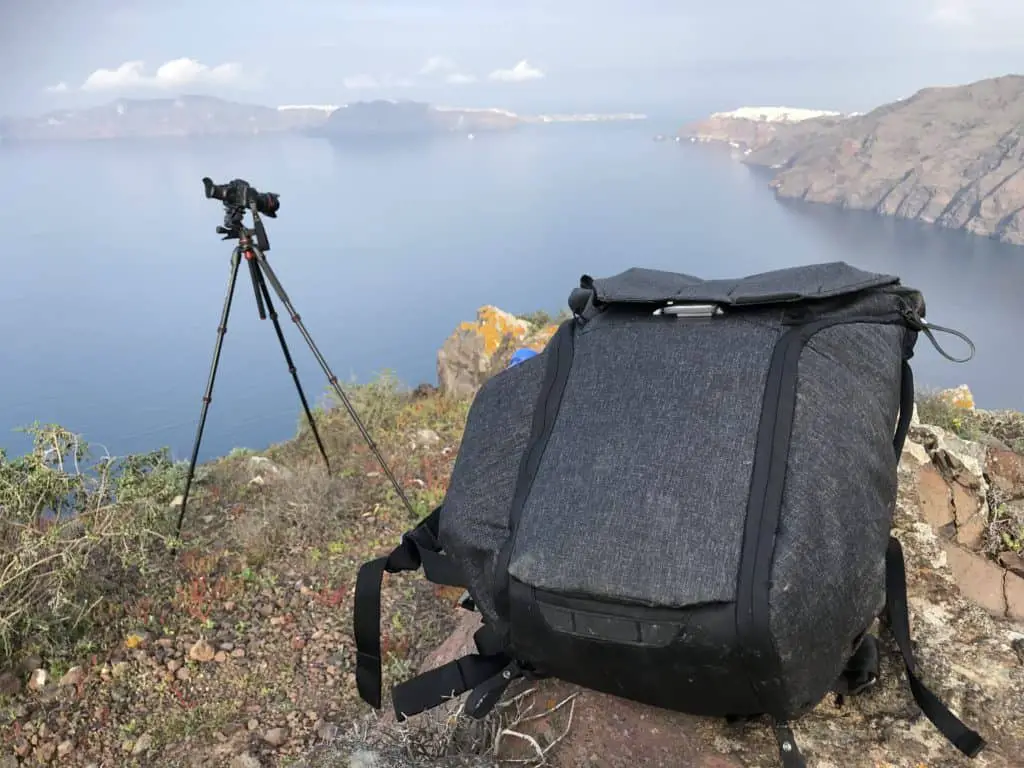
Now I restrict myself to a single backpack, the Peak Design Everyday Backpack. And the 20 litre one at that – not the larger 30 litre one. This is not only my camera bag for photography trips but also my hand luggage for getting to and from these foreign locations.
For the getting there and back bit I put some of the heavier stuff in my hold luggage, which gives me room for the inevitable airport/ plane purchases of newspapers I don’t read, crisps, snacks, small bottles of wine and over-processed sandwiches.
And of course smellies and discounted jewellery products on the plane.
When I am out and about taking photos I have just that bag with me. This bag takes a drinks bottle on one outside pocket and my tripod on the other.
And that is it.
Lightweight, nimble, minimalist. I only take essential things that I use on every trip. In one small lightweight backpack.
My gear page – and full time for disclosure
I have a separate page with all my gear listed here – there are affiliate links to all my gear, some to Amazon and the Peak Design one goes back to the good folks at Peak Design so if you use any of these links and buy something I get a commission.
Luggage
I am talking non-photography stuff here. And the point I want to make here is what exactly?
Well first thing is that stuff that is not breakable and heavy goes in my checked luggage. That and of course my Leatherman (aka potential weapon as far as airport security are concerned), lens cleaning fluid (i.e. liquid over 100ml) and my tripod. Yes that has a big impact on my luggage capacity. And the shoes I pack. More on that later….
But there is something else. I went to Santorini in April. Surely the weather is lovely on the Greek Island of Santorini in April?
Yes of course it is, but not that warm on top of the caldera at 4am!
When you are going on a photography trip you need to pack for the weather at times when sensible people are tucked up in bed. The times when you will be sat on top of a hill in the darkness not moving for potentially hours at a time.
For my photography trip to Santorini this consisted of a fleece, actual walking trousers and two red hats (of varying thicknesses – more on that later as well).
Packing
Breakables in my hand luggage, the rest in my hold luggage.
I don’t have a packing list, but I should do – that will be seriously useful. I might print off my gear list and use that as my packing list. This will serve two purposes.
- I will not forget anything.
- I will not pack anything that is not on the packing list.
I need to remember to add some non-photography stuff to my packing list, if I had one that is!
Getting there
Easy enough. Fly from Gatwick to Santorini, taxi from the airport to the hotel, job done. No dramas on the way or the way back. Everything was on time, nothing got lost, and the flight was absolutely fine. Flight time from Gatwick just under four hours. Airport transfer less than half an hour.
Nice and easy.
Where we stopped – the most excellent Kasimatis Suites in Imerovigli.
We stopped at the Kasimatis Suites in Imerovigli. My wonderful wife spent a lot of time choosing this excellent hotel, with amazing views of the caldera from the hotel itself. I will write a separate post about the hotel (when they get back to me with some info that is), but I need to tell you this now.
If you are looking for a hotel where you can photograph stunning sunrises and stunning sunsets from the actual hotel itself then this is a great place to stay.
I actually have a couple of photos on this website taken at the hotel – that is how good the location and views were.
And one of those photos was taken from inside our room. And another photo was an interesting shot of the hotel reception – yep I have managed to shoehorn architectural photography into this website!
At the hotel you can get breakfast delivered to your room on a tray which was great. I would get back from my sunset shoot, have a cuppa with my wife and wait for breakfast to be delivered – what a fantastic way to work!!
A great location, lovely rooms, great service – Kasimatis Suites in Imerovigli is highly recommended by both of us and we look forward to going back there.
Locations I photographed
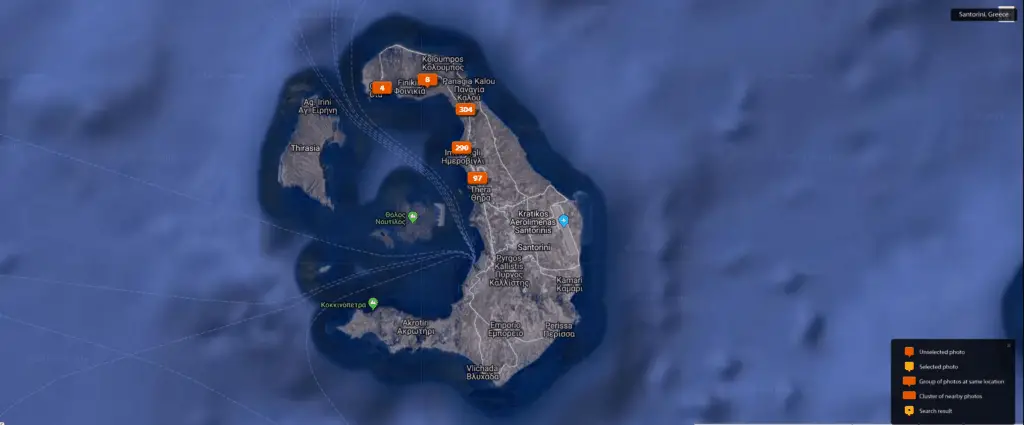
Well everywhere we went was on foot from our hotel in Imerovigli.
Here is the map from Lightroom which shows where most of the images featured on this website were photographed. I say most as there were a couple of times here the GPS on my Canon 6D did not work. But you get the idea of how little of the island I actually covered.
Sunrise on Santorini
This is what I am here for. I love my sunrises. I prefer sunrise to sunsets to be honest.
Normally when I am photographing sunrise I am on my own and have time to enjoy things. The downside is of course that I have to get up at stupid ‘o’clock in the morning.
When we were in Santorini I used to set the alarm for 4am, with my camera bag packed the night before ready to go. This is a case of preparation – I need to get up, get myself sorted and out of the house without waking anyone up.
It is colder before sunrise so you need clothing to suit, and also sunglasses that are effective enough to block that directional morning light whilst enabling you to read the tiny numbers on the camera. Difficult at my age..
And what were the sunrises like on Santorini?
Sunrise on Santorini was simply spectacular. Each day was different.
The first morning there was low cloud down below us. I walked down the steps at the hotel to the lowest rooms, and the cloud was right below me. You can read about this photo in the post Fantastic Santorini photography – low cloud at sunrise.
Other sunrises featured clear skies and sun, my least preferred, and on the other side of the island varying clouds and lighting, which you can read about in this post Probably one of the best Santorini photo locations?.
Santorini sunsets – how good are they?
I guess it depends where they are – you need to find the best sunset spots, which is the easiest thing in the world to do when you are stopping at the Kasimatis Suites – you are already there!
I even took this photo in the post Where can I see the sunset in Santorini from my hotel room? from our hotel room so good was the room we chose. When I say we I mean Nickie, my wife – the whole trip was down to her. And what a choice of hotel!
As I said I prefer sunrises to sunsets. Sunsets tend to happen at a more anti-social time than sunrises, at the time of day when I am away that I would quite like a beer!
Talking of which I did take some sunset shots whilst having a beer at the hotel which was lovely.
From Kasimatis Suites we got direct views of the sun setting directly above Thirasia on the other side of the caldera.
Santorini sunsets are pretty famous, and much photographed. I have tried to create some different sunset images.
And they are much warmer than sunrises.
Gear list.
This is the page with my gear list.
And this is all the gear with my new Peak Design Everyday Backpack.
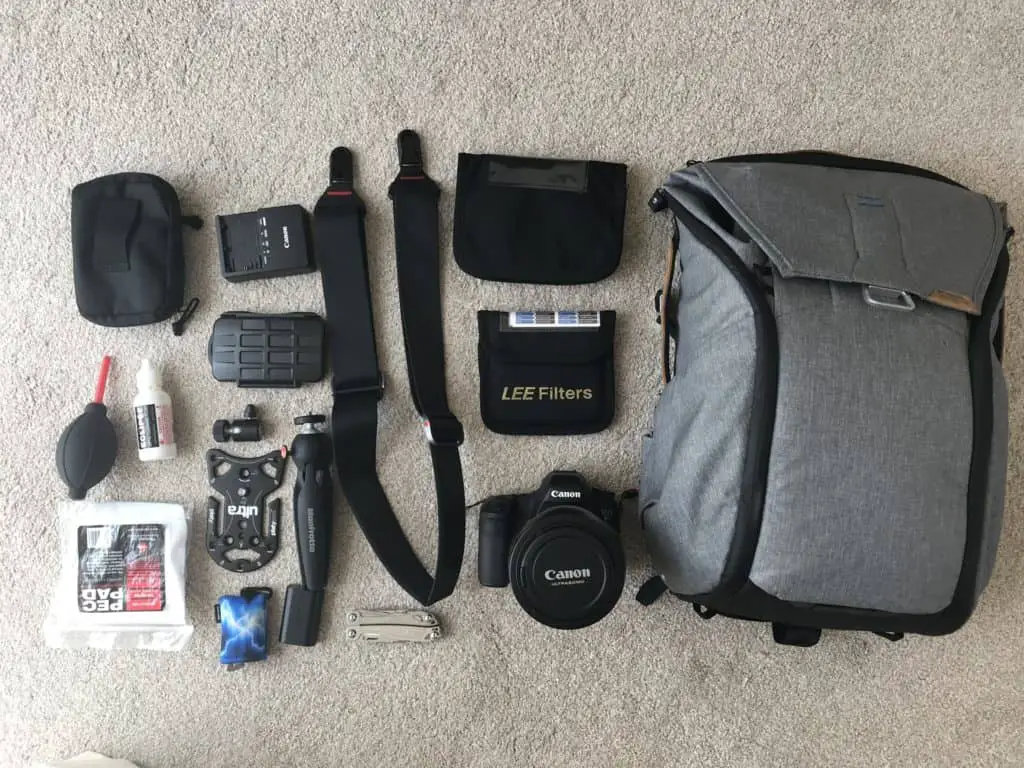
Nope – no spare camera body. A calculated risk as I have only ever had one body fail on me ever, and that was of my own doing. Even when I dropped my Canon 6D on a rock hard floor in a National Trust office it still worked fine.
So as long as I don’t drop my camera I should be fine…..
Image capture – how I take my travel photography images.
I use a very similar technique with my travel photography work that I have refined over my years as an architectural photographer.
The principles are the same for both architectural and travel photography – the subject is not moving, there are no people and I am on my own with time to create the compositions I want.
These are some of the key features of my image capture process
- I always use a tripod unless I am in a built up area or there just isn’t room.
- I only use either the 24-105mm lens or the 17-40 and 70-200mm lenses.
- I tend to shoot as wide as the lens allows. Top tip – I sometimes stick gaffer tape on my Canon 17-40mm lens so it stays at 17mm.
- I use back-button focus, and normally focus 1/3rd of the way into my composition.
- I use a loupe viewer so I can see the screen.
- I use Live View and the viewfinder to make my composition – I alternate between the two.
- I take time getting the composition I want. If I have time that is.
- I may take one photo of a composition, or lots if the light is changing, clouds moving or the sun rising or setting.
- I compose so there is no/ minimal cropping.
- I walk around a lot when I get to somewhere interesting to find things to photograph.
That should have been titled my Top 10 Santorini Travel Photography Tips! Ok it just has done.
These are some of the camera settings that I use on my Canon 6D.
- AV Mode – I use AV Mode, meaning all I need to do is select the aperture, normally the only variable I am interested in.
- ISO 100.
- F8 – F16 unless there is something specific that requires something else.
- RAW image capture – I shoot in RAW and convert to Jpeg later.
- Auto-bracketing – I take three bracketed images – the first is the correct exposure, the second two stops under-exposed and last one two stops over exposed. I merge these together afterwards in Lightroom.
- GPS on.
- Focus Mode – one shot.
- Drive Mode – continuous.
- Back button focus – I have separated focus and metering.
- I use the self-timer on my Canon 6D.
I use these settings all the time, meaning that I get not only a consistent set of images but of equal importance to me I don’t need to worry about my camera at all – all I need to think about is the aperture (if it is not F8) and where I focus – the rest is pretty much all sorted for me.
Leaving me to concentrate on the most important thing, the composition.
Do I use any filters?
All I have with me these days is my Lee Big Stopper ND filter and a circular polarising filter.
The Lee Big Stopper is a beast of a filter, giving me a 10-stop reduction in light passing through to the sensor. I use this mainly for photographing water. 10 stops gives me a much slower shutter speed which means I can get that lovely silky flat water, and variations on this.
I can also get movement in clouds.
And the best thing of all is that I can do this in broad daylight – outstanding.
I also have circular polariser that I rarely use these days to be honest. All my other filters are in a box in my garage.
Protecting my lenses
I do not use protective filters on my lenses – why would I? Why spend hundreds and more pounds on a camera lens and then stick a £50 filter on the front of it?
I have never damaged the front surface of a lens. I always have the lens hood on – that is the best protection for the front element in my opinion.
And I always put the lens cap on if I am not taking photos.
These two things have kept my lenses front elements safe and intact for a long time now.
And I hope that in writing this I am not tempting fate. I have just told my Tassimo coffee machine that after the last pack of coffee pods it is being replaced with a cafetiere (yes I do really talk to kitchen appliances). It responded by spewing coffee all over the place!!
Why do I do HDR image capture?
Simple. There is HDR which people like myself practice, and then there is the over processed HDR that looks all false and horrible. You know the things I mean – all over saturated with grungy textures and halos all over the shop.
I take three bracketed images, which I merge together in Lightroom. All this is doing is adding the extra bits of data in the scene that my Canon 6D cannot capture in a single image.
There is no trickery to this – that is all that is happening.
And I have to be honest doing this means I don’t have to think about the camera settings for the image capture as most things are covered.
You might call this lazy, and you might be right, but I am much more interested in concentrating on what I am taking photos of rather than fiddling with my camera settings.
Back-button focus.
A wonderful thing this is. What does back-button focus mean?
With my Canon 6D in its default setting, you press the shutter button and the camera takes the meter reading and focuses where the camera is told to focus. Now my Canon 6D only has 11 focus points so it is quite straightforward.
I have changed the operation of the shutter release button to activate the shutter only – there is a button on the back of the Canon 6D that I use for focus. I like to focus first, and then take photos as and when. I don’t want to be focussing every shot, as with a sunrise I could take a sequence of 10, 20, 30 or more images, and I want the focus point to be the same for all of the image captures.
AV Mode
I use AV Mode on my Canon 6D to keep things simple. I take most of my photos on a tripod, only hand holding in bright sunshine, when I am on the move or when there is no room for a tripod, like on those grey painted footpaths that meander through the white buildings of Santorini.
As I use my tripod I don’t really need to worry about the shutter speed unless it is particularly windy and trees and clouds are moving quickly.
I am interested of course in the aperture to make sure I get the depth of field I want for the composition, so I change the aperture for each shot and the shutter is sorted for me by the camera.
Lenses
I have three lenses for travel photography. I tend to use the Canon 17–40mm lens the most, and change to the Canon 24-105mm lens when I am walking around places. The Canon 70–200 F4 L lens I use as and when needed.
I sometimes go on trips with just my Canon 24-105mm F4 L lens, but for my photographic trip to Santorini I took all three lenses providing me with a back up in case one lens failed.
And that is part 1 of my Santorini Photography Tips done – click here for part 2.
One last thing
If you want to buy an image, or want to speak to me about future collaboration email me at sales@rickmcevoyphotography.co.uk.
Rick McEvoy ABIPP – Photographer, writer, blogger